Compiling Rust to WebAssembly: A Simple Example
Rust and WebAssembly (Wasm) are often discussed together. The former is a typesafe systems programming language with modern tooling and many high-level features. The latter is a portable, secure execution environment that runs inside and outside the browser. The combination promises many years of progress and utility.
Unfortunately, the path to starting with Rust and WebAssembly isn't as simple as it could be. A number of sophisticated technologies have popped up around the Rust/Wasm duo. This is great for experienced users but can overcomplicate getting started. This article aims to fill the gap with a no-frills introduction to building Rust code targeting the browser.
Overview
The goal of this project is to compile to Wasm a Rust function that adds one to a value passed in and returns the result. These are the steps:
- Create a vanilla Rust project template.
- Update the project's manifest file.
- Write a Rust function.
- Compile to optimized Wasm.
- Deploy the Wasm through a simple Web page.
Prerequisites
Begin by installing the Rust language tools with rustup if you haven't already. Next, install the Wasm toolchain:
rustup target add wasm32-unknown-unknown
Install wasm-gc, which will be used to compress the *.wasm file output:
cargo install wasm-gc
Finally, create a test project and change into it:
cargo new hello --lib

cd hello
Update Cargo.toml
The file Cargo.toml (aka "manifest") contains the project's configuration. Leave everything, but append a new block called [lib]. The result should look something this:
# Cargo.toml
[package]
name = "hello"
version = "0.1.0"
authors = ["Richard Apodaca <rich.apodaca@gmail.com>"]
edition = "2018"

[dependencies]

# new material
[lib]
crate-type = ["cdylib"]
Bring on the Code!
Rust code lives in the src directory. Your new project contains the default file src/lib.rs. Replace its contents with the following:
// src/lib.rs

#[no_mangle]
pub extern "C" fn add_one(x: i32) -> i32 {
    x + 1
}
This function accepts a 32-bit integer value, returning the result as 32-bit integer.
Compile to Wasm
Compile the project to Wasm:
cargo build --target wasm32-unknown-unknown --release
The result is a rather large Wasm file in target/wasm32-unknown-unknown/release/:
ls -la target/wasm32-unknown-unknown/release/hello.wasm
-rwxr-xr-x  2 rich  staff  1566966 Jun 28 20:05 target/wasm32-unknown-unknown/release/hello.wasm
Shrink the Wasm Output
The Wasm initially produced by the compiler contains a lot of unnecessary material. How much? To find out, use wasm-gc:
wasm-gc target/wasm32-unknown-unknown/release/hello.wasm

ls -la target/wasm32-unknown-unknown/release/hello.wasm
-rwxr-xr-x  2 rich  staff  209 Jun 28 20:05 target/wasm32-unknown-unknown/release/hello.wasm
wasm-gc cut the output to the bone, leaving a 209 byte file.
JavaScript and HTML
One of the simpler (but not only) ways to execute the Wasm output is with a browser running a little JavaScript. Add the following to a new file called index.html a the project root:
<!DOCTYPE html>
<html lang="en">
<head>
<meta charset="utf-8">
<title>title</title>
<script>
(async () => {
let response = await fetch('target/wasm32-unknown-unknown/release/hello.wasm');
let bytes = await response.arrayBuffer();
let { instance } = await WebAssembly.instantiate(bytes, { });
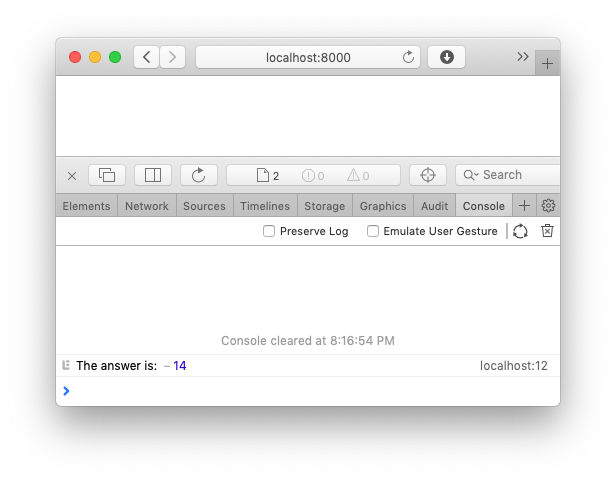
console.log('The answer is: ', instance.exports.add_one(13));
})();
</script>
</head>
<body>
</body>
</html>
Run the Example
You won't be able to load the HTML file in your browser directly due to security restrictions. Instead, you'll need to run a local server. A simple way to do that takes advantage of Python's built-in server:
python -m SimpleHTTPServer
Browsing to localhost:8000 should yield a blank page. Open a developer console to see the result.
Future Directions
With basic project setup out of the way, it's possible to explore many avenues. The most obvious may be to expand the range of input/output types. Wasm only understands four numerical types: i32; i64; f32; and f64. How can the project be extended to accept or output more complex types such as strings? This post may be a good starting point. But even keeping to the four native Wasm types, a number of complex programs can be constructed for benchmarking and other purposes. At the very least, studying this simple example will help clarify what the more advanced tooling such as wasm-bindgen is doing and why it may be useful.